


 By
By
Have you ever puffed and said, this tastes off? That is normally an indication that your vape needs to be cleaned. Regardless if you use a big tank, a replaceable coil, or a pocket-sized disposable pod cartridge, gunk can make the flavor dull, airflow difficult, and even decrease the device life.
Cleaning is not a matter of taste; it is a matter of performance and hygiene. A study conducted by National Institutes of Health observed that vaping devices may contain residue and bacteria (NIH study). Routine care renders you vape secure, clean, and effective.
We will discuss how to clean a vape tank, coil and pod cartridge, not to mention, include products you can use that make them a lot easier to clean by MoreVaping.
Why Cleaning Your Vape Tank Matters

The vape tank of your vaping device is its core and comprises e-liquid storage, a coil and a way to direct vapor. Sweet or dark e-liquids may leave behind residue which over time may cause flavor dulling, airflow blockages, and, in some cases, leaking or uneven heating.
Since tanks are hot and wet, they are also a breeding ground of bacteria in case they are not frequently cleaned. The rest of the vapers are advised to clean it up after 1-2 weeks and more regularly when continued vaping using sweeter and flavor-heavy juices and more regularly changing the flavor to maintain flavors.
How to Clean Vape Tank for New Flavor
Switching from dessert to a fruit flavor? If you don't rinse, you get a weird combination.
Quick rinse method:
1. Disassemble tank (remove coil and glass).
2. Rinse non-electronic parts under warm water.
3. Shake off water and air-dry on a towel.
For strong lingering flavors:
• It should be left in warm water (dipped in a drop of mild dish-washing soap) 10 to 15 minutes.
• Rinse well and dry completely.
Do not use any scented cleaners. Your next vape shouldn't taste like dish soap.
How to Empty Vape Tank Before Cleaning
To empty a vape tank without mess:
1. Remove from device.
2. Unscrew base.
3. Pour liquid into a sink or absorbent towel (dispose safely, nicotine can harm pets or kids).
4. Wipe chamber with a lint-free cloth.
The correct emptying helps to avoid combining old and new liquids, and flavor is preserved.
Deep Cleaning Vape Tanks
If you see persistent film or flavor still tastes off:
1. Disassemble tank completely.
2. Soak in warm, soapy water.
3. Use a soft brush to clean airflow and crevices.
4. Rinse well; optional 15–20 min alcohol soak for tough residue.
5. Dry thoroughly before reassembly.
Flavor is enhanced by deep cleans as well as coil clogging due to residue.
Recommended Vape Tank – Vaporesso iTank T Tank

Design is important concerning tank maintenance. The construction makes some tanks easier to maintain due to friendly nature. Here is when the Vaporesso iTank T comes in handy.
This 6ml sized tank also has a top-filling mechanism, so you do not need to take it out of your device to refill--the less handling, the less mess. It can also be disassembled easily due to its 3D Honeycomb Airflow System and there exists more large holes so that it becomes easy to clean without leaving a spot untidied.
Another bonus? The standard mouthpiece 510 tip is interchangeable, or else you can simply clean it up so you can clean the mouthpiece with the least amount of effort. The iTank T combined with the Vaporesso GTi Replacement Coils generates smooth and flavorful vapors, and is also easy to clean apart.
In case you want to make a serious effort to maintain a nice tasting vape, you may want to pull the trigger and spend a few bucks on a tank such as the iTank T which can save you time and frustration come cleaning time.
Understanding Vape Coil Cleaning

The coils vaporize e-liquid with heat but 'coil gunk' from sweeteners and dark juices will build up over time. Cleaning can bring back performance, but if a coil has been burned, only replacement can do.
Signs it's time to clean:
• Muted flavor
• Slight burnt taste
• Reduced vapor output
Cleaning Vape Coils for Longer Life
If not burnt, clean coils to extend life:
1. Remove coil from tank or pod.
2. Rinse under warm water.
3. Soak in ethanol, vodka, or isopropyl alcohol for 2–4 hours.
4. Rinse again and dry at least 12 hours before reuse.
Never dry-burn stock coils with cotton wicks, they'll scorch.
How to Clean Vape Coil for Better Flavor
For flavor recovery:
1. Remove coil when taste fades (before burning).
2. Rinse under hot water.
3. Blow through coil to remove excess moisture.
4. Soak in 50/50 warm water and alcohol for 1–2 hours.
5. Rinse and dry overnight.
Cleaner coils can taste fresh again but are 1–3 weeks good.
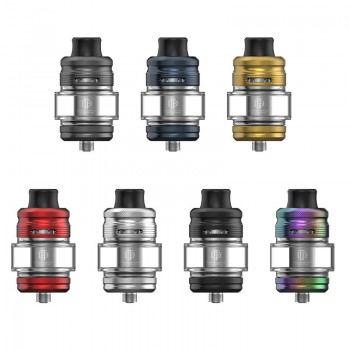
Recommended Replacement Coil – SMOK RPM 3 Coils

If cleaning does not help a coil, it means replacing it is time- some of the best options to consider include the SMOK RPM 3 Replacement Coils.
They are 0.15ohm and 0.23ohm mesh coils specific to the SMOK RPM 5 and RPM 5 Pro Kit. The mesh design enhances more surface area to ensure the coil distributes heat uniformly thus resulting in a greater taste and coil-durability. This also causes them to be less inclined to hot spots which burn wicking material prematurely.
The press-fit design is not only fast and clean but also reduces the time you take to replace coils because when you can do it without wasting a lot of time during your vape sessions. And since the mesh is heated more evenly, these coils are less prone to gunking up, so you may have a longer period of use before you have to give it a clean or even have it replaced.
If the vaper desires the ability to have a consistent heavy flavor all the time without having to maintain, combining a clean tank and fresh RPM 3 coils is a good way to keep your set up running at its best.
Why Pod Cartridge Maintenance Matters

Pod cartridges are a smaller type of tank that still requires attention. Most do have built-in coils so you can't just swap out the coil- you either clean the whole pod or go buy a new one.
Clean them is a must because:
1. Flavor retention: Leftover from old e-liqueur can mingle with new e-liquids in the tiny pod chamber.
2. Device health: Dirty contacts can cause misfires or weak performance.
With many vapers experiencing flavor drop, it's cost effective to keep them for longer by regularly cleaning.
How to Clean Vape Pod Safely
Learning how to clean vape pod parts, it comes down to being nice not waterlogging the wick, killing it.
Safe cleaning steps:
1. Remove pod from device to protect the battery.
2. Empty any remaining liquid into a towel or sealed container.
3. Rinse lightly with warm water (minimal water for built-in coils).
4. Shake out excess moisture and air-dry for several hours.
5. Clean battery contacts with a cotton swab and rubbing alcohol.
Tip: Don't soak non-removable coils for too long, as it may result in weak flavor ro weak leaks.
How to Clean Pod Cartridge for Best Performance
In case you are wondering how to clean pod cartridge to get maximum life and flavor:
• Disassemble if your pod design allows (mouthpiece or base removal).
• Soak parts in warm, soapy water for 5–10 minutes.
• Rinse thoroughly to remove soap taste.
• Air-dry for at least 12 hours to prevent trapped moisture.
Clean pods allow airflow, less coil strain, and a better tasting experience with e-liquids.
Recommended Pod Cartridges
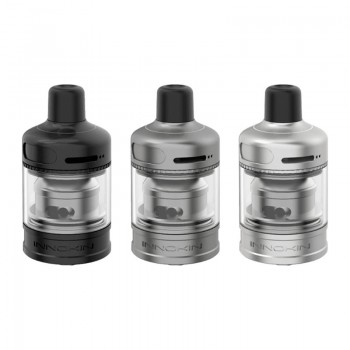
Uwell Caliburn G3 Pod Cartridge

The Caliburn G3 Pod Cartridge is easier to refill with high capacity of 2.5ml with side filling capability, which prevents scaring because of refilling. It also comes in 0.6ohm and 0.9ohm mesh producing a strong consistent flavor. Cleaning can be easy as well-just get to the fill port and rinse, dry off, and you are all set.
Vaporesso XROS Series Corex 3.0 Pod Cartridge

The Vaporesso XROS Series Corex 3.0 Pod Cartridge is compatible with the XROS family of devices, with a 2ml or 3ml version. It is both flavor chaser and smooth-draw friendly and features top-fill design and 0.6ohm or 0.8ohm resistances. It has an easy-access fill cap that ensures rinsing and drying becomes a breeze.
Conclusion
Keeping your vape clean will make it a better one. Knowing how to clean vape tank, cleaning vape coils, and how to clean vape pod systems ensures your device is performing optimally.
A complete clean once a week or once every two weeks will clean flavors and last coils longer in tanks. In the case of coils, cleaning may allow more time to use, but burned coils need to be changed, expensive mesh coils such as the SMOK RPM 3 are better to last longer. In the case of pods, a gentle rinse and maintenance of clean contacts may extend the life of the pod and save you some money.
When you invest in new equipment, opting for simple designs such as Vaporesso iTank T, Uwell Caliburn G3, and Vaporesso XROS Series Corex 3.0 ensures cleaning will take less time and it is less demanding, so be sure to check them out at MoreVaping - the best online vape store, to get great deals regarding new, user-friendly designs.
FAQs
1. How often should I clean my vape tank?
1-2 weeks or more depending upon how frequently they are changing up flavors.
2. Can I clean burnt coils?
Nope. You cannot recondition burnt coils replace them.
3. What's the safest way to clean a pod cartridge?
Dump it, cleanse, and dry out and then clean battery contacts with alcohol.
4. Can I use vinegar instead of alcohol?
Vinegar does the job but it has a very strong smell and alcohol is more neutral to clean.
5. How long do pod cartridges last with cleaning?
Cleaning can add up to several days to a week to the life of the vape but coils will nevertheless wear out.


comments